Getting started with Auto using Postman
This tutorial uses Postman and assumes you’ve obtained Authentication API credentials registering for a free Developer account. For instructions on how to download the tool and configure it for use with TypingDNA Authentication API, please see this tutorial. For an Authentication API and Recorder technical reference, please visit the documentation.
The /auto endpoint
The /auto Authentication API endpoint is a simplified interface that handles both enrollments and verifications for your users. It is designed to be a single point of integration for your application, and can be only the TypingDNA Authentication API endpoint you interact with. To understand what this means, let’s look at the flow for a typical authentication implementation with TypingDNA Authentication API.
Enrollment & Verification Flow
- When a user signs up in your app to be authenticated by their typing, you’ll need to collect a typing sample (or “pattern”) so they can be verified against that trusted pattern in the future.
- The user will type their samples in your app, and they are captured and converted to typing patterns by our client-side recorder.
- The patterns, along with an id to identify whose patterns you’ve collected, are sent by your backend to the /auto endpoint. In this example for a new user, this step represents an ‘enrollment’ request, as our system will recognize there are no previous typing patterns saved for the id supplied.
- A response is received from the Authentication API, confirming that the typing pattern was enrolled.
- We require 3 typing patterns to be saved for each user (minimum initial enrollments) before a verification can be performed. This requirement ensures we have established a sufficient baseline of their typing behavior for future verifications. Because of this initial requirement, you may choose to either:
- Repeat step 3 thrice for the user over a timespan of your choosing (to reduce friction on the user), or
- Have the user submit 3 typingdna patterns at once initially. While this may be a burden for some users, it has the advantage of preparing them for verification the next time they log-in. If collected at once, they may be submitted in the same call to the /auto endpoint via the tp parameter (see steps below).
- Once initial enrollments are captured and saved for a user, they are ready to be verified by their typing at next log-in.
With this conceptual overview of the authentication flow with typing biometrics in mind, we’ll take a look at what examples of these requests actually look like using /auto.
Postman: enrollment/verification with /auto
- Ensure you’ve installed Postman, imported the TypingDNA Authentication API collection, and entered your credentials obtained from the TypingDNA dashboard in the ‘Authorization’ tab.
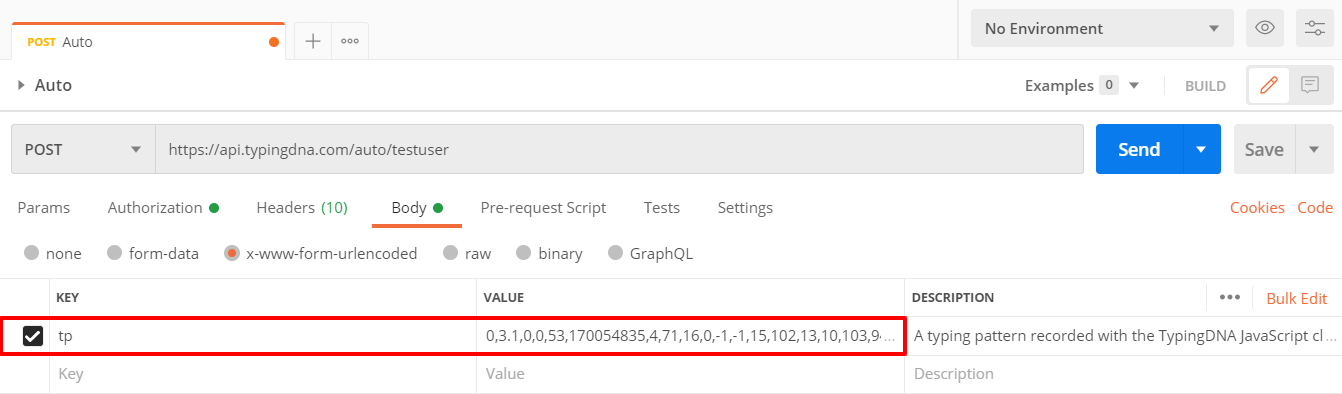
- First, we’ll simulate enrollment of a new user. Select the ‘Auto’ request from the collection, and enter a sample User ID for the new user in the request URI in place of the ‘:id’ parameter:

- We’ll need a typing pattern to submit as an enrollment for testuser. While this is normally generated by the TypingDNA Authentication API recorder you install on the front-end, we’ve created an online tool for testing purposes. Enter a sentence (remember it, you’ll need to do this three times to simulate initial enrollments), and click ‘Get typing patterns’. Three different typingdna patterns will be generated, in this example we will use Type 2 patterns, so copy those to the clipboard. Read about the differences between pattern types here.
- Back in Postman, paste the copied pattern into the ‘tp’ parameter in the body of the request.
- ‘Send’ the request and you’ll receive a response similar to the following:
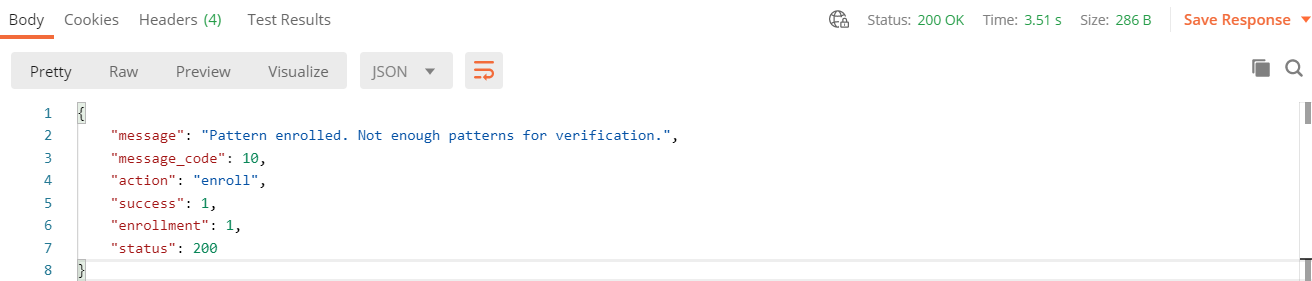
- You’ll need at least 3 typing patterns saved for testuser before we can begin submitting patterns as verifications. You must repeat steps 3-5 (with the same enrollment text used in the pattern output tool) two more times in order to have a total of three saved previous patterns.
- Now that the minimum initial enrollments requirement is met, we can simulate a verification attempt. Generate another (fourth) pattern using the pattern output tool for the same text, and paste it into the same ‘tp’ parameter in the /auto request used for the previous three, still with testuser as the ‘id’ parameter. Click ‘Send’.
- You should receive a response similar to the following:
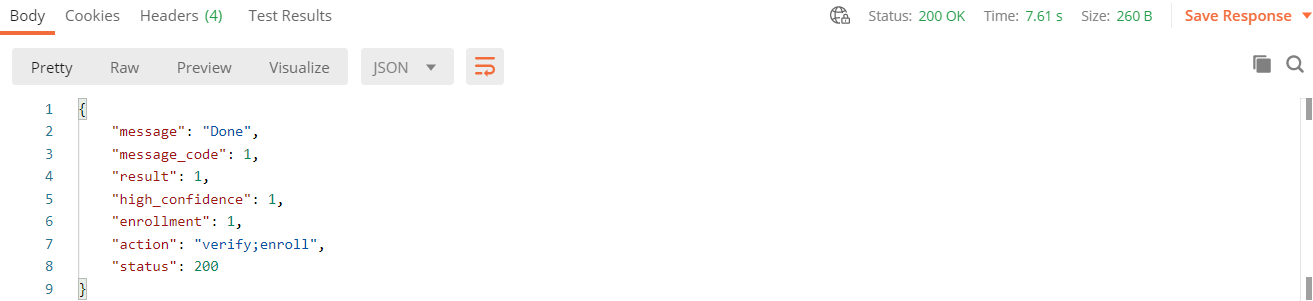
You’ll notice differences in the response. Because initial enrollments were already saved for the ‘id’, /auto determined our intention was to verify the user and returned a response accordingly -- in particular, a result, high_confidence and the presence of ‘verify’ within the action field indicate that a verification was performed.
This is a key feature of /auto, and from where it gets its name. The endpoint will automatically enroll or verify your patterns depending on the context of the request, specifically the number of previously saved patterns stored for the id (user) in the request parameters.
If this user (‘testuser’) submits any further patterns for the same text we enrolled three times, they would be considered verification attempts (equivalent to a user attempting to prove their identity by typing in your application). Future patterns may be enrolled as well after the initial enrollment period, but they will always be verified, and your application can depend on a result to be returned.
For field-level descriptions of the JSON responses seen in this tutorial, head over to the Authentication API docs.
Having an issue you can’t troubleshoot? Contact us at support@typingdna.com.
Related tutorials

