Set up 2FA on a Wordpress page with TypingDNA Verify - Standard Integration
What is 2FA for WordPress?
Two-factor authentication (2FA) for Wordpress is the authentication process that provides an extra layer of security beyond passwords, for your users, that helps defend against account takeover.
Goal
The aim of this tutorial is to lay out the steps for integrating TypingDNA Verify 2FA on a wordpress page. These steps can be used to create a custom plugin. This tutorial is designed for the users of the Wordpress website and not for the administrator of the website.
Intro
In this tutorial we will build a sample page on wordpress that will run TypingDNA Verify 2FA. We will cover all technologies that are needed to run a simple demo on a local machine.
Prerequisites
In order to create a working example of TypingDNA Verify 2FA, the following actions need to be taken:
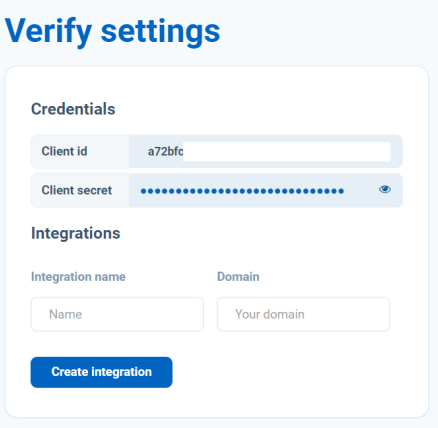
Create an account on typingdna.com. The Verify 2FA dashboard will provide you with the clientId, secret and applicationId.
Have an account on Wordpress with a business subscription that will allow you to run plugins.
Now that we have integrated the TypingDNAVerifyClient, next we will initialize TypingDNA Verify 2FA where we will pass as parameters the clientId, secret and applicationId.
$typingDNAVerifyClient = new TypingDNAVerifyClient($client_id, $application_id, $secret);
You will need to initialize the variable with the actual values from the Verify 2FA Dashboard.
Once the variable is initialized we will generate the data attributes required to start TypingDNA Verify 2FA.
This will help us generate the TypingDNA Verify 2FA pop-up window.
The javascript callbackFn will be called once the TypingDNA Verify 2FA process is completed. So we will add the following code to redirect us to another page with the OTP (one time password) that was generated from the Verify window.
Replace new_page with the link of the new page that we will create later.
<script>
    function callbackFn(payload) {
        window.location.href = "new_page?otp=".concat(payload['otp']);
    }
</script>
Next we will create a sample page where we will add the code snippet that we created.
[xyz-ips snippet="verify-button"]
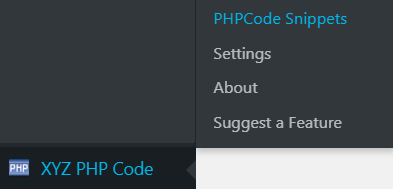
Next we will navigate to the PHP Code Snippet plugin to create another snippet.
Next we will create another page that will match the new_page link that we mentioned in the code in the header. We will add the following code to print out the result of the authentication.
[xyz-ips snippet="verify-check"]
The success value indicates if it was a valid authentication 1 or if it was invalid 0.
For the production environment, in order to send OTPs via emails you will need to integrate your Verify 2FA account with SendGrid from the dashboard.
Share this message across Slack, email, etc. We even jotted down some of the highlights to make it easier.
Check this out! 🚀 Found a cool way to 2FA our users: TypingDNA Verify 2FA. It authenticates people based on how they type — replacing authenticator apps and OTP codes. Awesome user experience! 🙌 Quick integration too (under 10 mins). And we can try it free with 100 users. What do you think? https://www.typingdna.com/verify