Navigate to the typingdna-verify-2fa directory and start your development server.
cd typingdna-verify-2fa && php artisan serve
You can now test your setup by accessing link: http://127.0.0.1:8000.
Implement Laravel Second Factor of Authentication
Next we will set up the TypingDNA Verify settings.
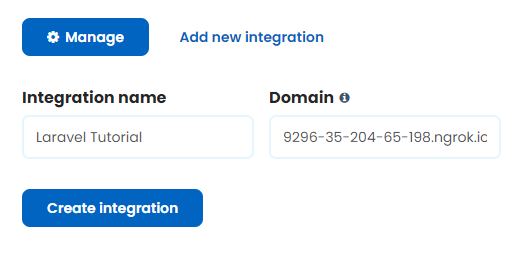
Create an account on typingdna.com. The Verify 2FA dashboard will provide you with the clientID, secret and applicationID.
Setup ngrok. Ngrok creates a public url that will link to your localhost environment. For security purposes, TypingDNA Verify 2FA will only run on a public url. Ngrok can be downloaded from the following link: https://ngrok.com/.
Navigate to the folder where you have downloaded ngrok and run the command:
ngrok.exe http 8000
A bridge will be created that will forward to our localhost.
Now we can test that our solution runs by running the ngrok link, in our case: https://9296-35-204-65-198.ngrok.io (make sure to always use the https version).
Laravel Backend
Now we will set up the backend of TypingDNA Verify. We will navigate to the app folder and create another folder called “Services”. Inside we will create the TypingDNA.php file.
We will create our first function getDataAtributes that will help us generate the TypingDNA Verify button.
public function getDataAttributes() {
    $typingDNAVerifyClient = new TypingDNAVerifyClient(env('TYPINGDNA_CLIENID'), env('TYPINGDNA_APPID'), env('TYPINGDNA_SECRET'));
    $typingDNADataAttributes = $typingDNAVerifyClient->getDataAttributes([
        "email" => env('TYPINGDNA_EMAIL'),
        "language" => "EN",
        "flow" => "STANDARD",
    ]);
    return  $typingDNADataAttributes;
}
We will set up the private and public keys in the .env environment.
Next we will add the TypingDNA Verify button that will use the attributes that we will generate in the backend.
<button
    class = 'typingDNA-verify'
    data-typingdna-client-id='{{ $clientId }}'
    data-typingdna-application-id='{{ $applicationId }}'
    data-typingdna-payload='{{ $payload }}'
    data-typingdna-callback-fn= 'callbackFn'> Verify with TypingDNA
</button>
The button will call a callback function once the process is completed. This function will also contain the OTP generated.
We will handle this function by redirecting the user to another page with the OTP as one of the parameters. We will do with the following javascript function that we will add in the header.
<script>
    function callbackFn({otp}) {
        window.location.href = `/result?otp=${otp}`;
    }
</script>
Next we will create the result page:
Under routes/web.php we will add the following code that will read the OTP parameter.
We will create a copy of the welcome.blade.php and rename it to result.blade.php.
Replace the code of the button with the following code that will print if the authentication is successful or not:
{{ $result }}
Verification Process
Let’s test our application:
Access your ngrok link:
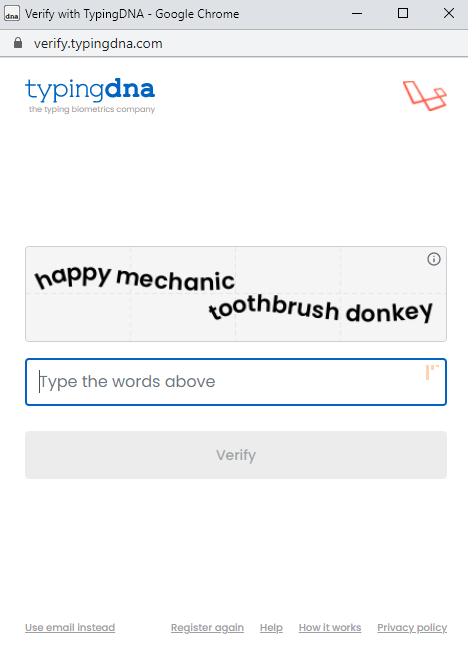
Select the button and type the 4 words that are presented on the screen:
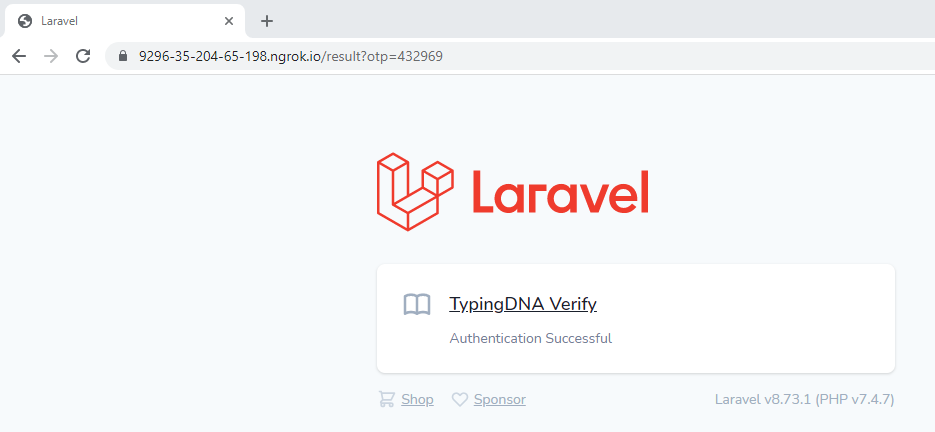
Next you will be redirected to the result page with the success message:
If you have more questions about TypingDNA Verify 2FA feel free to contact us at support@typingdna.com.
Tell your team there’s a better way to 2FA
Share this message across Slack, email, etc. We even jotted down some of the highlights to make it easier.
Check this out! 🚀 Found a cool way to 2FA our users: TypingDNA Verify 2FA. It authenticates people based on how they type — replacing authenticator apps and OTP codes. Awesome user experience! 🙌 Quick integration too (under 10 mins). And we can try it free with 100 users. What do you think? https://www.typingdna.com/verify